How to Make Old-fashioned Rag Rugs
Suzanne is an artist and writer who enjoys designing, crafting, and upcycling.
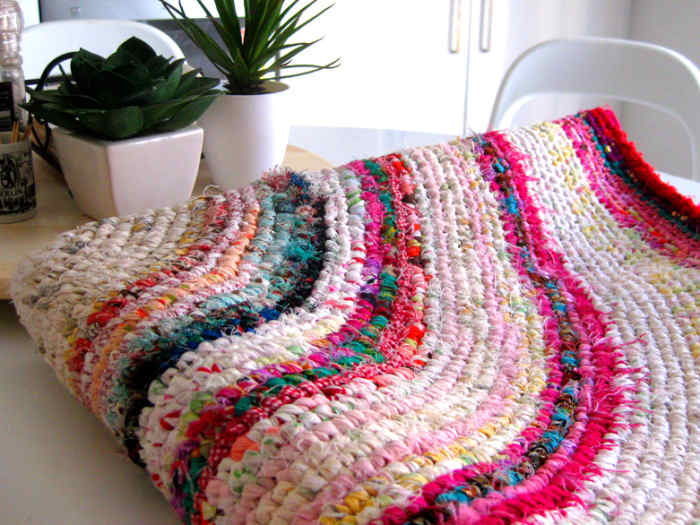
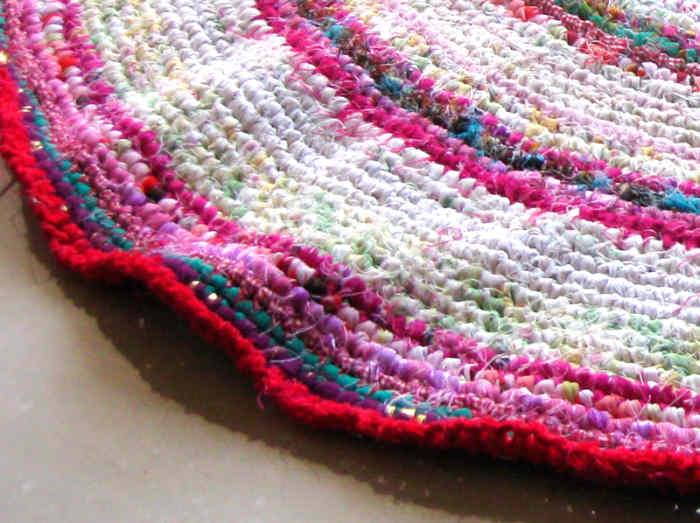
Larn how to make a finely woven and colourful rag carpet just like this one.
© 2014 Suzanne Day
Easy DIY Rag Rug Projection
If you're looking for an easy, fun project that doesn't crave much mental effort (apart from selecting colours and doing bones crochet), then making a rag rug is the perfect project for you!
Brand one while in front end of the television, and after the starting time few rings, it can be done in autopilot, without paying too much attention to information technology.
Suitable for fabric hoarders, rag rugs are very hardy and will happily go through the washing machine a multitude of times. They are also easy to repair with a needle and thread, should a loop come up undone. You don't need to buy a lot of craft materials to get started; a crochet hook, scissors, needle, thread and the right fabric is all that is needed.
Quick Fabric Guide
Fabrics That Work
- Cotton fiber and 100% cotton
- Patchwork fabrics
- Delicate dress and skirt material
- Delicate scarves
- Thin, lacy defunction
- Lycra and spandex
- Silk
- Former cotton bedsheets
- Cotton fiber doona covers
- Thin nightdress fabric
- Floaty, delicate wearable
Fabrics to Avoid
- T-shirts (unless they are really sparse)
- Towels
- Flannelette
- Leather
- Denim jeans
- Anything thicker than 1mm
Choosing the Right Cloth
Often the only thing continuing between a potential rugmaker and an outstanding rug is obtaining the right material to work with. If you imagine fabric as thin equally a tissue, that is what to wait for.
While other tutorials recommend items such as recycled T-shirts and towels, if you desire a finely detailed carpeting with tightly woven loops, you will need to have thinner and flatter fabric, preferably material that doesn't shred at the edges or pause off into little bits.
A modest chip of shredding is fine, merely if the fabric drops $.25 everywhere afterward cut i side, you'll know information technology's the wrong i. Elasticated or polyester fabric is fine, as long as it is thin. The thinner the material, the better—transparent fabrics work well, equally does cotton.
Make sure that the fabric is of a certain length and width. To practice the centre rings, a minimum of 30cm x 60cm may be needed and as you lot work outwards, more than fabric is needed per colour ring. I oft detect bedsheets are the right size to work with on the large outer rings, while a recycled brim is the correct size for inner rings.

Thrift stores and op shops are smashing places to find attractive, floaty fabrics and patterned sheets for a reasonable price.
Shutterstock
Where to Obtain Fabrics
Firstly expect for any items in your wardrobe that have ripped in the wash. Chances are, they are exactly the kind of delicate, floaty fabric we are looking for. Quondam nightdresses with holes in them, or doona covers that have worn too thin are perfect for rag carpeting making.
If y'all have any spare patchwork fabrics or other fabrics which weren't 100% cotton but look OK, these can exist used too. Visiting your local thrift shop, recycled clothing store or op shop can yield cheap but attractively patterned bedsheets, skirts, dresses and other wear with thin textile.
Read More From Feltmagnet
Obtain a mix of different coloured fabrics to work with. In this photo, I have used clothing, scarves, bedsheets, spandex and some spare leftover fabrics.
© 2014 Suzanne Day
Handy Tips for Purchasing
- Use highly decorative fabric for the brightly coloured rings (see photos). And then utilize bedsheets or haberdashery material for the bulk of the outer rings, to minimise costs.
- Big printed patterns show up every bit stripes when rag rugged. Small patterns (think mini florals) show the design better. Information technology'south good to attempt a mix of both.
- If you desire a multi-coloured upshot, like my rug, get fabrics that contain lots of colours in the i fabric, and also get some plain 1-colour fabrics in some of your primary colours.
- Feel free to work golden or silver printed fabrics into the rug as well—printed cotton fiber is best, and then information technology doesn't shred. You can also use sparsely sequinned fabrics for a bit of texture.
Choosing a Colour Theme
You don't accept to choose a theme if you don't want to. Merely having a color palette picked out means that y'all won't spend money on unnecessary fabrics. If yous're getting a lot of colours together, it tin can add up, and then it's a good idea to have colours picked out.
Firstly, make up one's mind if you lot desire a lighter or darker coloured rug. Then determine what your main three colours volition be. In the example of the carpeting I made, I chose pink, blue and yellow every bit my main three colours.
After I'd obtained a couple of fabrics, I cut minor parts off them and carried them with me, to see how the new fabrics would blend with the existing ones.
I bought the bed sheets in calorie-free pink and yellow outset, then obtained the patterned and coloured fabrics after checking they would match the look of the rug.
An case of unproblematic gradation.
© 2014 Suzanne Day
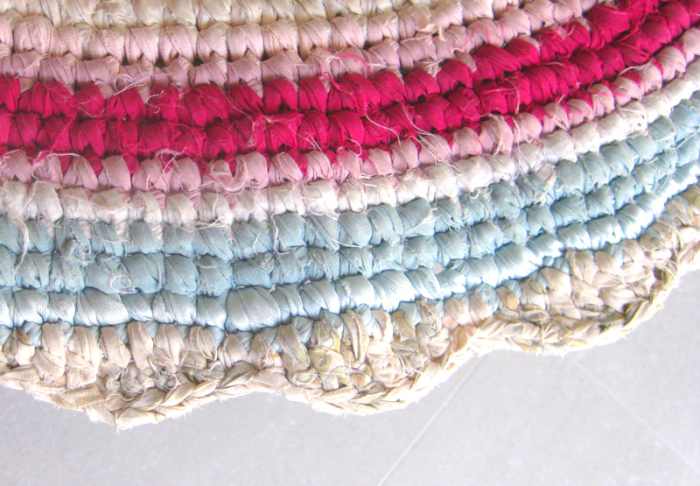
Gradation
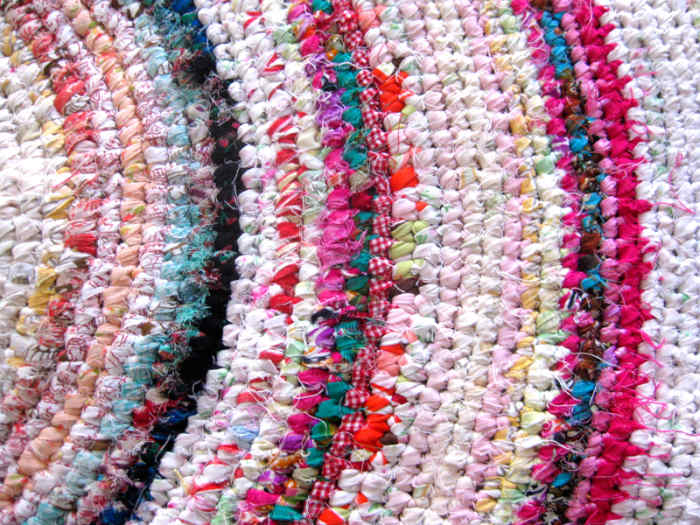
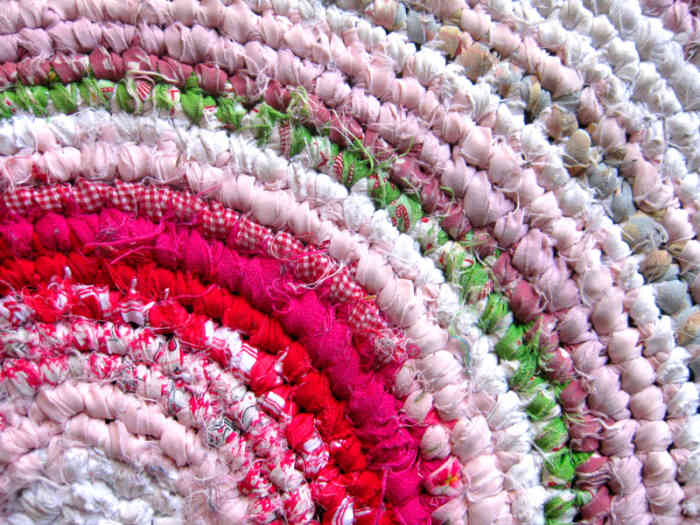
Y'all'll notice that in my rug, the coloured rings await gradated, that is, they blend from lighter to darker. Using gradation in rag rugs makes them announced much more attractive and is the way that professional rag rug makers do information technology.
To perform gradation, just make sure that your fabrics are used in order from lighter to darker (for a light rug) or from darker to lighter (for a nighttime rug).
Each coloured band should have the stripey or patterned colours first later on the main canvass color, followed by the more solid colours and ending with the nearly obviously visual solid colour before returning immediately to the primary colour over again.
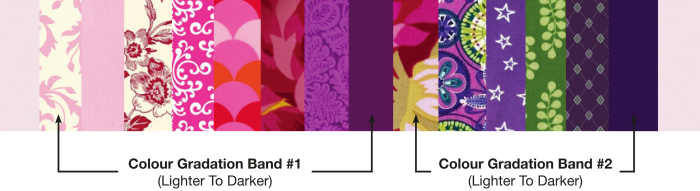
In the example beneath, you tin see that to create a coloured department, I used two gradated bands to add a scrap of pep. Feel complimentary to experiment with this technique, but ever use the brightest, most solid colour on the end of your gradation to get the right effect.
Gradation A
Click on the image to enlarge.
© 2014 Suzanne Day
Gradation B
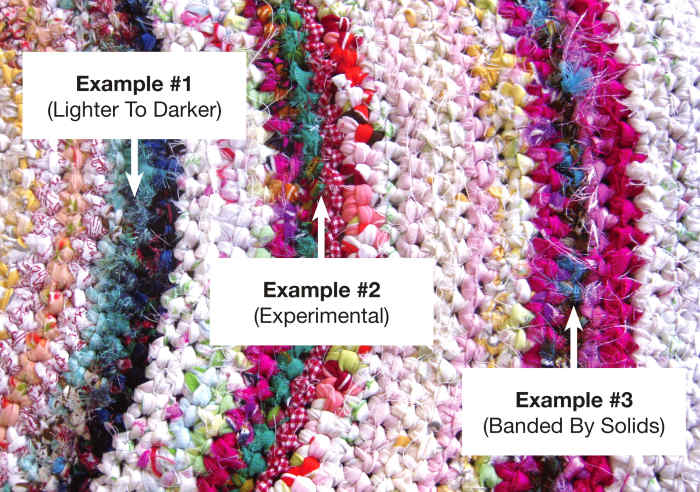
Three examples of different types of colour banding. Example #one gives you the all-time idea of what can exist accomplished with gradation.
© 2014 Suzanne Day
How to Cut Fabrics
- Cut fabrics in a direction to get the longest strips from them.
- Cut strips of exactly 1cm wide (no wider). Practice non tear or rip, merely cutting with abrupt pair of scissors.
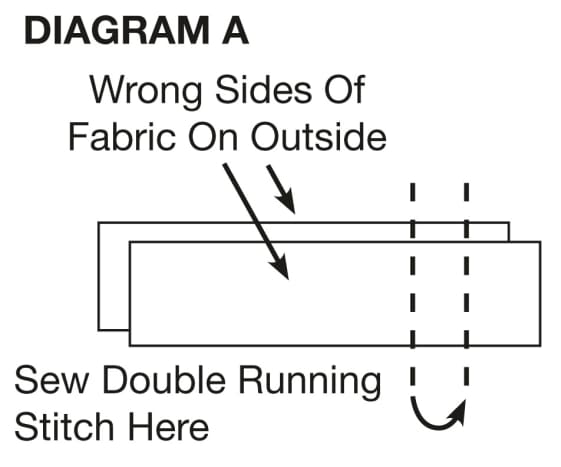
- Double stitch right side strip ends together with cotton thread in a running stitch as you run out of fabric, so that the strips do not become tangled up (Diagram A).
- Exercise not roll strips into a ball as this gets heavy and tangled when rag rugging. Add together strips as needed every bit you get.
- Cut tops past trimming off any thick hems at the top, bottom and end of sleeves. Then create cylinders of material (Diagram B).
- Cut skirts by trimming off thick hems on the waist and bottom of the skirt and create a cylinder (Diagram C).
- Cutting 1cm strips of fabric from cylinders (Diagram D). Keep original side seams intact (don't unpick side seams). If side seams are loose, you tin can double sew together a running stitch to reattach them dorsum together, but most times you lot won't demand to.
Materials
Yous will need:
- 3.25mm / Size 10 crochet hook
- Sharp scissors
- Needle
- Cotton thread
- Different coloured fabrics
Making a starting loop.
© 2014 Suzanne Day
Unmarried Crochet Stitch
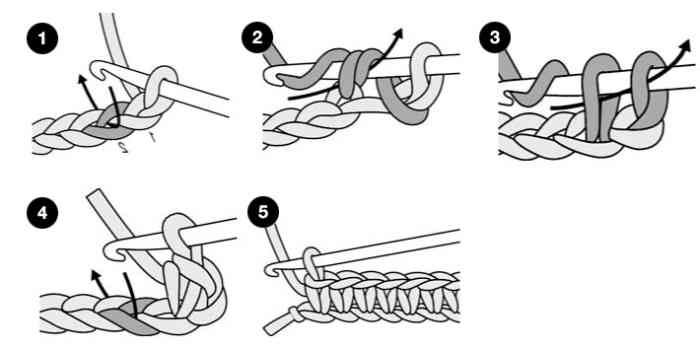
Click to enlarge. one. Claw through side by side stitch. 2. Yarn over and pull through. 3. Yarn over and pull through remaining loops on hook. iv. Next stitch. 5. Finished row.
© 2014 Suzanne 24-hour interval
Rag Carpeting Instructions
For the purpose of this tutorial, I will at present refer to the fabric strips every bit "yarn". I am assuming you lot accept a basic knowledge of crochet; however, I've also included some diagrams/videos to assist.
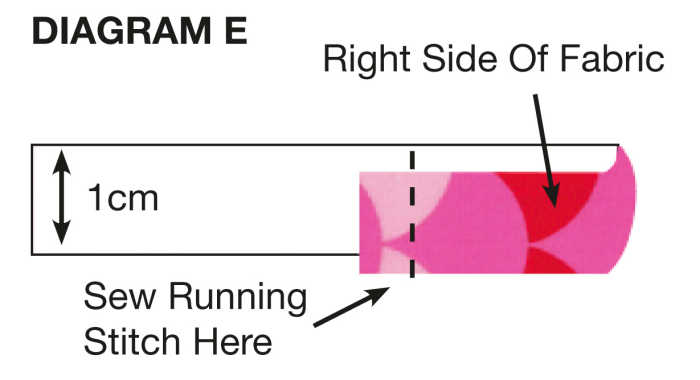
Step i. Fold over 2cm of one end of your starting strip with the right side of the fabric on the outside, and run up a line beyond it (Diagram E) so it forms a loop. Brand certain to knot thread at the start and run up a few knots at the terminate so the sewing doesn't undo.
Step 2. Brand a foundation band of half dozen-8 stitches using the chain method, then work 12 double crochet stitches into the ring and join up. Yous tin also try the Magic Ring method if you lot similar, simply I use the traditional concatenation method.
Of import: As you pull through your fabric yarn through loops and on the crochet hook, try to always have the right side of the material showing. Some people like to fold the "yarn" in half lengthways, with the right side on the outside. This means that your rug will accept the right colouring as intended, rather than the incorrect side of the fabric showing.
Pace iii. After making the starting band and double crochet ring as per video, beginning working coloured rounds using unmarried crochet stitch.

Too much increasing of stitches will make the edges of the rug frilly like this, and it won't sit down flat.
© 2014 Suzanne Day
How to Add Colours
For the first few starting rounds, use 1 colour as it is easier. Then, select a new colour and attach equally per Diagram A.
To starting time the new colour, put your crochet hook into the next stitch of the work, and where possible, yarn over using the yarn that is by the join, and so the join remains on the dorsum of the work.
Don't forget to brand certain the right side of the fabric is showing as you piece of work!
How to Increment
All rag rugs are unlike in weight and shape, due to the unlike fabrics independent. Hence there is no definitive pattern for rag rugs. You will demand to increment the number of stitches as needed.
When yous notice the edges of your carpeting curling up slightly, you will need to increase stitches on the side by side round to brand the rug prevarication apartment again.
I usually do it past doing ratioed amounts (for example, four single crochet stitches, followed past 2 single crochet stitches in 1 pigsty). This ratio tin vary. The idea is to try to make the carpeting lie flat after doing a round or two of increasing.
Sometimes, this can involve doing some increasing, assessing it, then undoing the round and trying a different ratio. It is easy to disengage the round, just pull very gently on your fabric yarn to disengage information technology.
You lot will know when the increasing is too much, because the the rug will get frilly and it won't sit down apartment, just instead will have textile bunching upwardly on the edges. With practise, this will get a very like shooting fish in a barrel process.
An instance of a decorative crochet border.
© 2014 Suzanne Twenty-four hour period
How to Finish the Rug
To finish the rag rug, simply complete the final circular, trim off the fabric yarn, leaving a 6cm tail, then pull the textile yarn through the loop on the crochet hook and pull to make a knot.
Turn over the work and on the underside, weave the tail into the work (weave it through the aforementioned coloured stitches) and attach it properly with a needle and cotton fiber thread, using a few knots and stitches.
Trim thread, trim excess tail yarn.
If you would like to add a decorative crochet edge, complete the finishing pace above, then add the crocheted edge to the finished rug every bit a separate project (doing it this mode strengthens the rug).
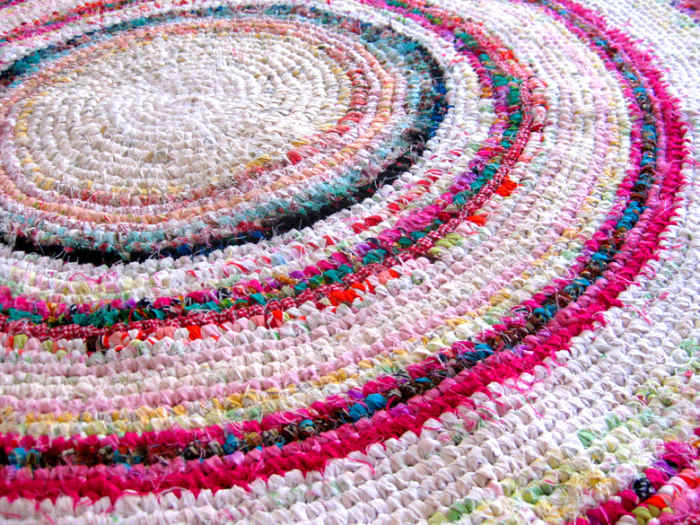
The finished rag carpeting.
© 2014 Suzanne Day
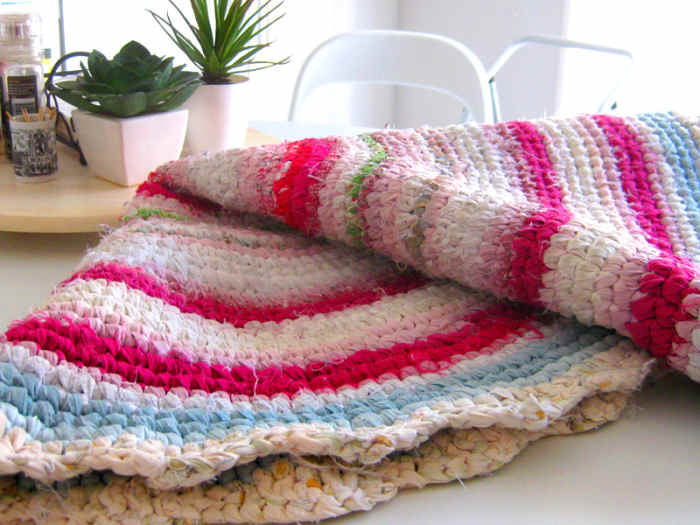
Some other rag carpet I accept made, with a larger fabric width and a larger crochet claw. It didn't turn out equally detailed as the master ane in this tutorial.
© 2014 Suzanne Day
Using the Technique on Other Projects
Information technology'due south possible to use the techniques in this tutorial to create other projects, such equally fabric baskets, cup insulators and other items.
Rag rugging results in stiff projects that concord their shape well, while having unique textures and colours.
The pull a fast one on to changing the shape of a rug into a basket is merely to fix the base sphere to the size you want, and so don't increase stitches at all, and the work will form a natural cylindrical shape.
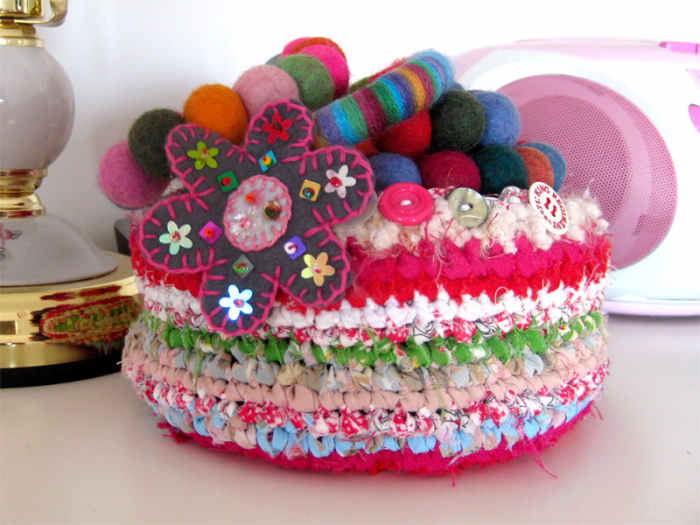
This fabric basket was made using the same technique every bit rag rugging, mixing 1cm textile strips with fluffy wool to add texture.
© 2014 Suzanne Day
© 2014 Suzanne Day
Jane Giesbrecht on August 09, 2020:
An excellent tutorial on how to brand a round crocheted rug. Well written and easy to understand. My mother and grandmother made many crocheted rugs. They were very frugal, commonly out of necessity, and so every scrap of material from whatever source was saved. They made potholders from pocket-sized scraps. You have aroused my involvement in making a rug. Would y'all please take some time to explore how to hang my hundred-year-old ROUND rugs as decorative art?
Thanks for writing the tutorial.
J on January 22, 2020:
Excellent
Maggie Griess from Ontario, Canada on June 02, 2017:
I recall cut rags for woven rugs for my mother. They were 2 inches broad. My hands would get sore afterwards awhile. I imagine cutting is best done as 1 works the rug to avert this. I have some old sheets I might want to use up this way. Thank you for these instructions!
Audrey Hunt from Pahrump NV on January twenty, 2017:
I'k back to read this tutorial once more. I desire to make this. At to the lowest degree I'one thousand willing to requite it a skillful try. Such a good hub with keen instruction and photos. Thanks once again and wish me luck!
GreenMind Guides from USA on Jan 18, 2017:
This is really great hub. I similar the way you lot write. Yous have soe actually cracking creative ideas in this hub. Thanks!
Melody on October 28, 2016:
Practise THEY STILL HAVE FABRIC SHREDDER? IT Fabricated THINGS Become Then MUCH FASTER. THAT'Southward A LOT OF CUTTING. Give thanks Yous, And then MUCH FOR THE Swell INFO.
Melody JAMISON, SORRY Most THE CAPS. I SEE IT EASIER.
poetryman6969 on October 18, 2015:
I actually like the colorful result. It's as well bad you tin't use one-time blue jeans.
Barbara on September 27, 2015:
what a wonderful detailed post, have read many, thankyou so much for sharing, so many pins, so many googles!! AND there it is all in one blog.
I dearest the carpet. Such talent.
DebMartin on June 21, 2015:
Oh, I take not made a rag rug in years. I'm inspired to accept upwardly the project again this winter. I and so loved my colorful rugs. I practise remember though I didn't much like the sewing function. I'll have to get over that. Thank you!
Marlene Bertrand from USA on June 20, 2015:
I had not realized how intricate the process was. A petty strategic planning goes a long fashion. That rug looks absolutely gorgeous!
Peggy Woods from Houston, Texas on May 07, 2015:
This is certainly a great way to upcycle old garments and bed sheets, etc. Would also look neat in a country abode setting or with that type of décor. Rag rugs are certainly serviceable and tin can stand the test of time. I did larn how to crochet many years ago and made some crocheted blankets for baby cribs, etc. Your rug photos and that handbasket you made look really prissy. Cheers for the tutorial. Will pin it to my crafts board.
Suzanne Day (author) from Melbourne, Victoria, Australia on March 26, 2015:
Thanks! Unfortunately I am non didactics classes on it at the moment just I'll go on yous in mind if I practice!
bang-up from Abode Sweet Dwelling house on March 24, 2015:
oh darn, I do non know how to crochet. I would dearest to try this though
Audrey Chase from Pahrump NV on March 24, 2015:
Your rugs are just stunning! I want to brand 1 and will follow your first-class instructions. Will accept to look until my cleaved finger heals just meanwhile I tin start collecting fabrics. Big cheers and big votes. Will share.
Patricia Scott from North Central Florida on March 24, 2015:
These are so rustic looking ..I similar the look and feel of them. While I take had several given to me I have never made one. Your directions were very detailed and all but I am 1 of those that would need to see you do this. As a matter of fact, I would join your form if you were teaching one on this topic!!!
Thanks for sharing.
PInned to Crawly HubPages shared and voted up++++
Vespa Woolf from Peru, South America on February 02, 2015:
I love rugs. I´ve never realized how much work it would be to make a rag rug! You never know--I might actually get the courage to endeavor this someday. Give thanks you for your clear instructions and information on gradation.
Faythe Payne from USA on October 18, 2014:
Beautiful, I desire to endeavor this
Peg Cole from North Dallas, Texas on September 25, 2014:
Quite inspiring and your detailed instructions make me desire to brainstorm a rag carpet projection (to add to my many other unfinished ones...) Cute work and your directions and pictures are bang-up.
Audrey Howitt from California on September 25, 2014:
Honey this! And so am sending it effectually--very useful!
Tanya Jones from Texas USA on September 13, 2014:
I needed this. I take lots of flake textile. I likewise need to make a rug for beneath the kotatsu. Solution found. Great hub.
Suzanne 24-hour interval (writer) from Melbourne, Victoria, Australia on July 23, 2014:
Howdy MizBejabbers, I accept seen those plastic bag ones. They're skillful for other uses, just forget the bathroom every bit they ARE cold and non-absorptive. Using fabrics in rugs and making them well means you tin can put them in the washing motorcar 101 times and they get more absorbent with each wash. I think the plastic ones are amend as pool mats or brute mats (eg for a muddy grand). I have seen successful plastic weaving as shopping bags.
Doris James MizBejabbers from Beautiful Due south on July 23, 2014:
Very nice work, Suzanne. Your instructions are so detailed that anyone who crochets should be able to practice these rugs. It reminds me of my mom who passed away in 2008. She was an artist and a crafter. She crocheted several small "rag" rugs (bathmat sized) out of colorful plastic bags (from Walmart, grocery store, newspaper, etc.). I still have them, but they are too cold on the bathroom floor and don't absorb water. Voted you up++
Dianna Mendez on July 01, 2014:
Welcome! I just started crochet once more and detect it relaxing. Your work here is intricate and shows creative talent. I'm sure I can brand the rug from your detailed instruction. Thanks for sharing.
Linda Bilyeu from Orlando, FL on June thirty, 2014:
I saw these rugs at Target recently, I must confess, I bought i...I lack the patience for making one myself, but your hub and tutorial is fantastic!!
Dennis Hoyman from Southwestern, Pennsylvania on April 12, 2014:
Thanks Suzanne
Suzanne Twenty-four hour period (author) from Melbourne, Victoria, Australia on April 11, 2014:
Become for information technology @gardener den! Maybe attempt a crocheted teapot stand sized 1 beginning? Shouldn't accept longer than a couple of hours if you're new to it. Bask calculation lots of colors and would beloved to hear how information technology goes :)
Dennis Hoyman from Southwestern, Pennsylvania on April 11, 2014:
Suzanne give thanks yous for your commits I am going to see if I can learn to crotchet to try to make these rugs. thank again gardener den
I will let y'all know how I do.
Suzanne Day (author) from Melbourne, Victoria, Australia on Apr eleven, 2014:
@gardener den, information technology's non difficult to do. Maybe practise first on a small 1 to get the hang of it and after you've done one or 2 yous won't need to think too hard. These rugs are a spinoff of toothbrush rugs from the quondam days merely information technology's far easier and quicker doing them with crotchet and fabric yarn in 1cm widths.
Dennis Hoyman from Southwestern, Pennsylvania on April 10, 2014:
Thanks Suzanne great hub! But I don't know if I can practice this? Have to endeavor this i time. thanks again Gardener Den
Suzanne Sheffield from Mid-Atlantic on March 09, 2014:
I've been saving material to do this. Thanks for the excellent instructions!
weblogpublication on February 22, 2014:
Love the detailed tutorial, and the rug is beautiful. Great hub!
Susan from India on February 21, 2014:
Wow... Suzanne they expect so beautiful. Cheers for sharing such a wonderful hub. Voted up and beautiful.
Devika Primić from Dubrovnik, Croatia on February 21, 2014:
How To Make A Colourful Rag Carpet is a beautiful hub your creative ideas are perfect.
Audrey Howitt from California on February 12, 2014:
Oh I want to get do this!
Toy Tasting from Mumbai on February 09, 2014:
This is such a great hub, thanks for sharing such an important information. :)
Sanghita Chatterjee from Kolkata on February 08, 2014:
This is such a useful hub! Thanks for this! Pinned!
lcbenefield on February 08, 2014:
crawly. I use this technique with men's button down shirts cut into strips to brand handbags. I'll have to try making a carpet or basket. Thanks for sharing.
Cleo Wolff from South Carolina, United states on February 07, 2014:
Love this! I have always wanted to acquire how to make these and now I know how. Thank you lot!!!
Suzanne Twenty-four hour period (author) from Melbourne, Victoria, Australia on February 05, 2014:
Hi MJennifer, Diagrams B & D are in in that location, you have to click on the thumbnails to see them. Glad you lot liked the rag rug instructions!
Marcy J. Miller from Arizona on February 05, 2014:
Suzanne, I was so excited to meet your hub equally I dear rag rugs and would dear to repurpose my former sheets and shirts to make 1. Forgive me if I overlooked information technology, but are yous missing diagrams B - D? I'm only asking because I am looking forward to using your hub in making my carpeting -- and I am an absolute beginner at this. I hope I tin recall how to crochet -- it has been many years since I last did so!
Thanks for such a nifty, well-written tutorial. I hope I tin overcome my lack of skills in this area and make my own gorgeous carpeting!
Best -- Mj
Suzanne Solar day (author) from Melbourne, Victoria, Commonwealth of australia on February 05, 2014:
Hi Moonmaiden, cheers for the pickup on the word "crotchet" vs "crochet". I accept amended the spelling and then it is more suitable for the Us marketplace, because Americans are big rag rug fans, whereas in Australia just a few people are into it. Cheers!
Fayme Zelena Harper from Lucerne Valley, CA on February 05, 2014:
Hello. I've done this once with t-shirt yarn merely I like your way better. It'due south a good use for all the old sheets I have effectually here. Many are sizes that no longer fit my beds. Some are just plain erstwhile, and many were inherited from various places. What a crawly collection of photos besides. In the USA we spell it 'crochet'. I didn't realize there was an alternate spelling. I need to proceed my optics peeled for my big crochet hook and then I tin can make ane of these.
Emma Lindhagen from Stockholm, Sweden on February 04, 2014:
Great tutorial! Rag rugs are pretty common in my country and I've e'er wanted to have a go at making i. I'll have to bookmark this page and so I can come up back to it.
Suzanne Solar day (author) from Melbourne, Victoria, Australia on February 04, 2014:
Thank you everyone, for your kind comments.
@pstraubie48, yes personal copies are fine....just not internet and website copies!
Chitrangada Sharan from New Delhi, India on February 04, 2014:
What a cute Carpeting! So colourful and and then creative!
I would love to try this ane.
Thanks for sharing the details! Voted up and shared on HP!
Peg Cole from North Dallas, Texas on February 04, 2014:
This project looks like a lot of fun besides using up unused cloth and putting worn out garments and linens to use. Nicely explained and illustrated.
RTalloni on February 04, 2014:
Such a brilliant, pretty projection! Thanks for the details provided in this mail service.
Kimberly Schimmel from Northward Carolina, USA on February 04, 2014:
I am braiding a carpeting with strips cutting from old sweatshirts. I should use this crochet technique with my cotton scraps.
Patricia Scott from Northward Primal Florida on February 04, 2014:
Then glad you shared this. I have been wanting to make i of these for and so long. Your directions are smashing and the photos are helpful. I take copied this so I can follow your directions easily.
PInned
Angels are on the way to you lot ps
Dolores Monet from East Coast, U.s. on Feb 04, 2014:
This rug is so pretty! A friend of mine is making a braided wool rug. I didn't realize you could as well make i with a crochet claw. I love how you added instructions for your graphics also!
Joan Veronica Robertson from Concepcion, Chile on February 04, 2014:
A fantastic Hub! Cheers for this, information technology is inspiring. Voted up and shared!
Thelma Alberts from Federal republic of germany on February 04, 2014:
Wow! That looks amazing. I have lots of quondam but proficient apparel which I could use for this inventiveness. Thanks for sharing. Voted up and pinned for later use.
Diane Ziomek from Alberta, Canada on February 03, 2014:
I have fabricated two rag rugs then far, and they have withstood the examination of time. We walked on them for a few years, and now they are keeping the cold and snow out of our outdoor cat business firm. Your basket is very pretty; love the felted items inside. :) The rug is very nice too.
Victoria Van Ness from Fountain, CO on February 03, 2014:
Oh, this is beautiful! I've seen these in many friends' houses and even in the store and have always wanted to brand ane on my own. I'll have to send pictures when I become ane done for myself! Great article!
Mona Sabalones Gonzalez from Philippines on Feb 03, 2014:
This is a lovely rag rug, and the fact that yous recycle old clothes and fabrics makes information technology and then much fun. The tips y'all give, like using iii main colors are almost helpful and the instructions quite detailed.
moonlake from America on February 03, 2014:
Beautiful rug. Wish I had time to start one but I volition keep your instructions. Voted up and pinned.
Phyllis Doyle Burns from High desert of Nevada. on February 03, 2014:
Suzanne, I love this hub. Your photos and instructions/tips are peachy. I love the thought of making a basket with the same fabrics as the carpet -- this enhances the rug and the await of the room, to bring it together in a charming way. My mother used to make rag rugs and they were beautiful. You brought back some skilful memories for me. Thanks!
Rebecca Mealey from Northeastern Georgia, USA on February 03, 2014:
Wow! People apply to make these when I was a child. Cheers for the memories, what an awesome tutorial! All votes upwardly, shared and pinned!
Jayme Kinsey from Oklahoma on February 03, 2014:
Beautiful carpeting and tutorial! I've fabricated modest braided rag rugs earlier, but this looks like it would be faster. Plus, it has a dissimilar texture. Will definitely be trying in the future. Voted up!
Becki Rizzuti from Indianapolis, Indiana on February 03, 2014:
Smashing tutorial! I've crocheted rugs out of yarn, simply never washed the rag rug before. I think I'm going to give it a attempt when my family moves to our new home. Voted UP, UAI shared to Facebook and pinned!
Emerge Gulbrandsen from Norfolk on February 03, 2014:
Suzanne Day - this is such a beautiful Hub - very artistic with some great instructions. Terrific Job! Voted up
Janis from California on Feb 03, 2014:
How beautiful! I never knew these blankets could exist made from scraps. I really like the basket as well. Voted up.
Heidi Thorne from Chicago Area on Feb 03, 2014:
What beautiful projects and photos! I've e'er wanted to try this. At present I take a expert set of instructions (for when I get around to it). Thanks much!
Dreamer at heart from Northern California on Feb 03, 2014:
Your instructions and suggestions volition be a assist to many new rug makers! I ever wondered how these rugs were fabricated to expect so inviting. Three gold stars to you.
Shampa Sadhya from NEW DELHI, INDIA on Feb 03, 2014:
A cute creation with a very well explained direction. Simply bully work!
sujaya venkatesh on February 02, 2014:
colourful north elaborate rugging sus
Rose Clearfield from Milwaukee, Wisconsin on February 02, 2014:
Wow, I was not expecting such a detailed tutorial! Your rug is gorgeous, and I actually capeesh the thorough directions. The wide mix of colors in the carpeting is so inspiring.
Miranda from Los Angeles, California on February 02, 2014:
very nicely explained. I capeesh your hard piece of work :)
Trevor Asher from Maryland, Us on Feb 02, 2014:
Hi! New here. I just want to say that although I have no experience with crafts to speak of, I really enjoyed this hub! Impossibly informative and artistic and a job very well done!
Catherine Taylor from Canada on February 02, 2014:
What an incredibly well done hub. I have a lovely rag rug that one of my Female parent'southward friends made for me as housewarming present and now am tempted to give it a try myself.
Donna Herron from Us on February 02, 2014:
My grandmother made a couple of rag rugs (out of wool cloth, I think) that my parents still have today. I never talked to her about the procedure or knew anything virtually it, only I'd dearest to make a rug for my own home. Your tutorial makes my dream seem like a reasonable goal :) I beloved the colors you used for your rug - so pretty. Definitely pinning for when I have the guts (and fabric) to try this! Thank you for the cracking hub!!
Donna Hilbrandt from Upstate New York on Feb 02, 2014:
What an I interesting project. I didn't realize that these rugs were crocheted fabric. I similar the handbasket idea as well. Pinning for a time when I can manage a fun project :)
Suzanne Mean solar day (writer) from Melbourne, Victoria, Commonwealth of australia on Feb 02, 2014:
Well, I am a professional graphic designer, with 12 years experience, then that is why I am so with information technology re: Adobe software. But once upon a time I used to utilize Publisher and Discussion too. I highly recommend taking a curt course in Photoshop, it really opens upwardly your mind to new possibilities, and especially then with Hubpages! And at that place are lots of gratuitous tutorials on the web to assist. Information technology can certainly make your photos await better with but a petty bit of learning involved for each outcome you lot want to learn.
Sharon Vile from Odessa, MO on February 02, 2014:
Thank you for the explanation! Yous are way more savvy about this stuff than I am. I used the "depict" toolbar in Give-and-take, which is much more crude and wouldn't produce diagrams of that quality. And then I puzzled over how to get them to upload, and finally figured out that I would have to convert them to jpg files.
I will accept to have a look at what photoshop will practice. I never got skilful at that. Virtually of what I know about these aps I learned from my kids.
Suzanne Day (author) from Melbourne, Victoria, Australia on February 02, 2014:
PS - The "click to enlarge" is a feature on Hubpages, where you lot tin add a film, write "click to overstate" in the caption and and so it should all work.
Suzanne Day (author) from Melbourne, Victoria, Australia on Feb 01, 2014:
Hi everyone, thanks for your lovely comments. Regarding the diagrams, I drew them in biro on a piece of paper start. So I went into Photoshop and did the outlined shapes for the fabric-looking pieces. And so I took those into Indesign and added text, arrows etc. Then I made a print quality PDF, opened information technology in Photoshop and cropped information technology to size. It'south rather a long process...so perhaps a shorter process would be to depict them in biro, have them into Illustrator and trace over the top of them to get a similar effect (merely without fabric).
Beak Holland from Olympia, WA on February 01, 2014:
I will pass this one to Bev....it'southward actually non my way merely she will love it. Cheers!
Sharon Vile from Odessa, MO on Feb 01, 2014:
This is a truly amazing hub! Really skillfully washed--and I'm jealous. The carpeting is gorgeous and the photographs are wonderful, just I was peculiarly impressed with the diagrams. I just finished a hub with much simpler diagrams, and the whole process gave me a lot of trouble. The "click to enlarge" characteristic is great, as well. Care to share how you lot did the diagrams and the click to enlarge?
FlourishAnyway from U.s. on Feb 01, 2014:
Absolutely beautiful, and I will exist trying this! I've ever wanted to exercise this, and now this hub provides everything I need -- as well as the visual boot offset. Sharing, pinning, voted manner upward. Gorgeous.


0 Response to "How to Make Old-fashioned Rag Rugs"
Post a Comment